SSブログ

「MariaDB」のコマンドラインでデータベースを作る。 [MariaDB]

「MariaDB」のコマンドラインでデータベースを作る。

■「MariaDB」をコマンドで操作。

       
      [bibo-roku@centos ~]$ mysql -u root -p ←「MariaDB」に「root」で接続。
        Enter password: 
        Welcome to the MariaDB monitor.  Commands end with ; or \g.
        Your MariaDB connection id is 255
        Server version: 10.0.17-MariaDB MariaDB Server

Copyright (c) 2000, 2015, Oracle, MariaDB Corporation Ab and others.
Type 'help;' or '\h' for help. Type '\c' to clear the current input statement.
MariaDB [(none)]> ←「none」には設定するデータベース名が入る。
MariaDB [(none)]> create database if not exists phpbasic2 character set utf8 collate utf8_unicode_ci; ←データベース作成。 Query OK, 1 row affected (0.00 sec) MariaDB [(none)]> show databases; ←データベースの確認。 +--------------------+ | Database | +--------------------+ | information_schema | | mysql | | performance_schema | | phpbasic | ←「phpMyAdmin」で作成。 | phpbasic2 | ←確認。 | wp | ←「WordPress」のデータベース。 +--------------------+ 6 rows in set (0.01 sec) MariaDB [(none)]> use phpbasic2 ←「phpbasic2」データベースに移行。 Reading table information for completion of table and column names You can turn off this feature to get a quicker startup with -A Database changed MariaDB [phpbasic2]> MariaDB [phpbasic2]> create table if not exists enquete( ←「enquete」テーブル作成。 -> code int primary key auto_increment, ←「codeフィールド」作成。「primary key」「auto_increment」設定。 -> nickname varchar (20) not null, ←「nicknameフィールド」作成。「not null」設定。 -> email varchar (20) not null, ←「,」で複数設定。 -> goiken varchar (50) not null); ←「;」で終了。 Query OK, 0 rows affected (0.17 sec) ←作成完了。 MariaDB [phpbasic2]> show columns from enquete; ←カラムの確認。 +----------+-------------+------+-----+---------+----------------+ | Field | Type | Null | Key | Default | Extra | +----------+-------------+------+-----+---------+----------------+ | code | int(11) | NO | PRI | NULL | auto_increment | | nickname | varchar(20) | NO | | NULL | | | email | varchar(20) | NO | | NULL | | | goiken | varchar(50) | NO | | NULL | | +----------+-------------+------+-----+---------+----------------+ 4 rows in set (0.00 sec) MariaDB [phpbasic2]>
 先日「phpMyAdmin」で作成したデータベースの設定をコマンドラインで再現してみようと思います。 「MariaDB」に接続する際の「-p」はパスワードを送信するオプションだそうですが、「mysql -u root -p XXXXX」と入力するんじゃないんですね。
 初め間違えてしまいました。そりゃそうですよね。丸見えですもんねぇ。

「create database if not exists phpbasic2 character set utf8 collate utf8_unicode_ci;」を分解すると、
「create database」データベースの作成。
「if not exists」作成するデータベース名が既存の物と重複しないかチェックし存在しない場合のみ作成。
「phpbasic2」データベース名。「phpbasic」を以前「phpMyAdmin」で作成したので「2」に。
「character set utf8」文字コードを「UTF-8」に。データベース毎に設定可能。
「collate utf8_unicode_ci」照合順序。データベース毎に設定可能。

「create table if not exists enquete(」 「enquete」テーブルを作成。「;」を付けないことにより「->」が出現しモード? が変り複数行で入力するようになります。
 初めはこれに戸惑いましたねぇ。「;」を最後に付けることで打ち込みが終了になります。
「-> code int primary key auto_increment,」 「code」フィールドの作成。
 構文:CREATE TABLE テーブル名(列名[code] 型[int] PRIMARY KEY ,列名2 型);
 主キー制約を付ける事により、一意の番号が保障されなおかつNULLの値が入らなくなります。

「-> nickname varchar (20) not null,」
 構文:CREATE TABLE テーブル名(列名[nickname] 型[varchar] NOT NULL ,列名2 型);
 NOT NULL制約を付ける事により、NULLの値が入るのを防ぐことが出来ます。

 コマンドラインで作成してみましたが「phpMyAdmin」と比べると構文を知っている必要がありますが、一画面に沢山の項目がある「phpMyAdmin」より迷いが無いと思います。
 個人的には両方を使えば、知らない設定も理解が早くなる気がしました。


「phpMyAdmin」で「MariaDB」を操作する。 [MariaDB]

「phpMyAdmin」で「MariaDB」を操作する。

■「phpMyAdmin」でデータベースを作成。

       
http://192.168.0.66/phpmyadmin/ ←ログインする。
phpmyadmin_login.png

phpmyadmin_top_page.png 「データベース」をクリック。
phpmyadmin_make_database_page.png データベース名「phpbasic」に、照合順序「utf8_unicode_ci」に。「作成」クリック。
phpmyadmin_make_table_page.png 左に作成されたデータベース「phpbasic」を確認。テーブルを作成、名前「enquete」に。カラム数「4」に。「実行」をクリック。
phpmyadmin_make_tableconfig_page.png 図のように入力。「保存」をクリック。
phpmyadmin_make_tablecompletion_page.png データベース完成。
 26日、28日の記事と連動しています。  先日作成したPHPのアンケートプログラムをphpMyAdminを使用してMariaDBに連動させます。この練習は書籍にあったものを実践したものです。ありがとうございました。
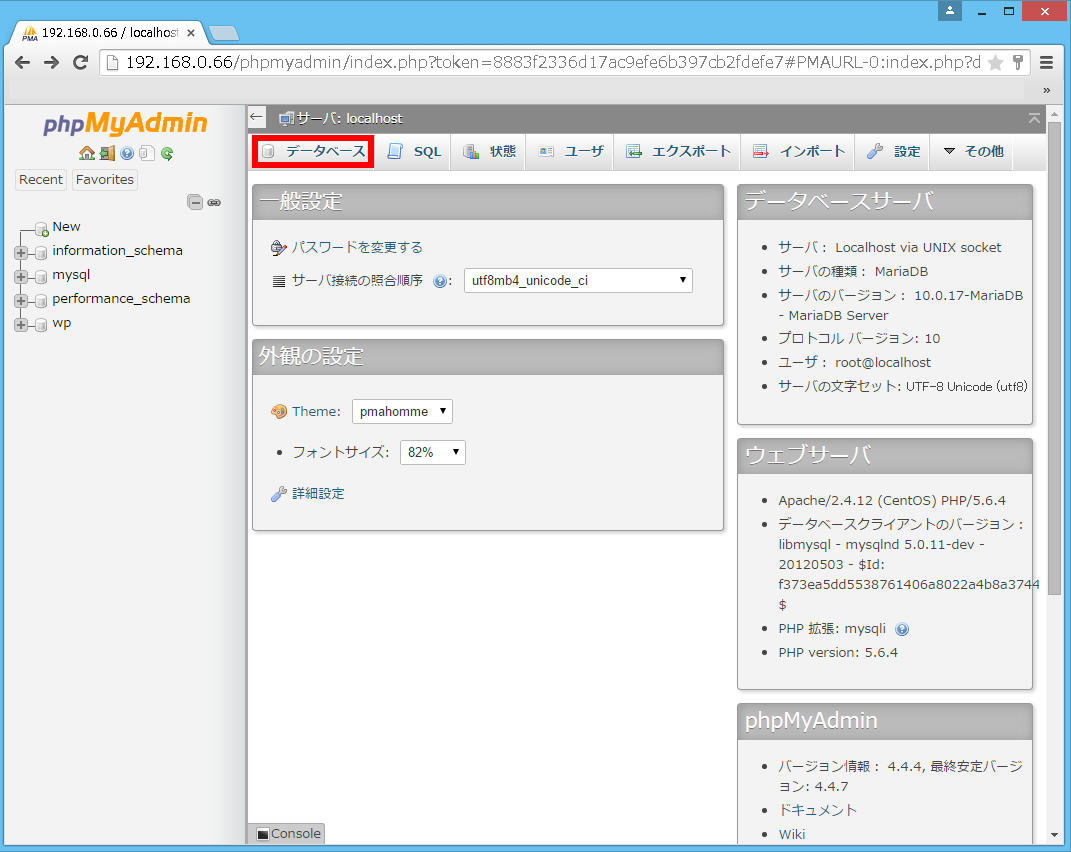
 まずはブラウザからphpMyAdminにアクセスします。「データベース」をクリックすると作成ページに移動します。
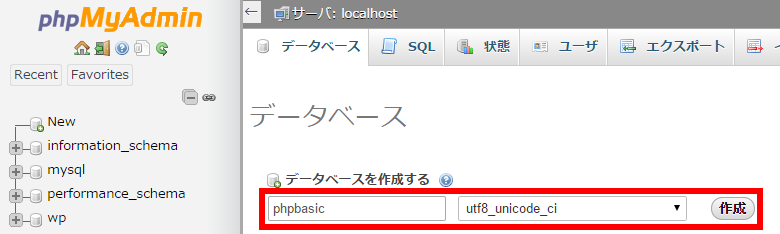
 作成する「データベース名」と「照合順序」を入力し、「作成」します。
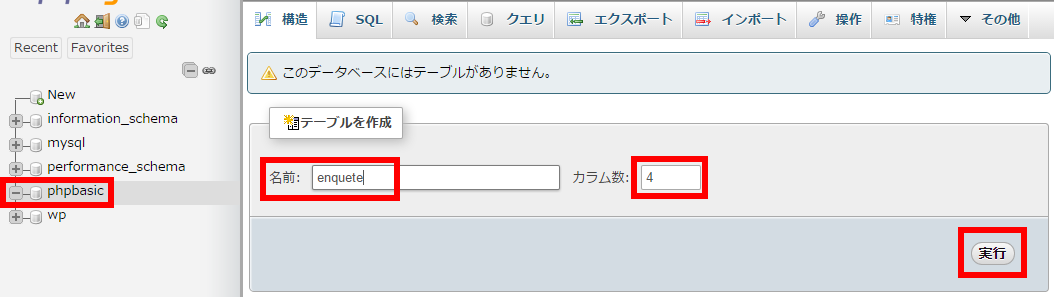
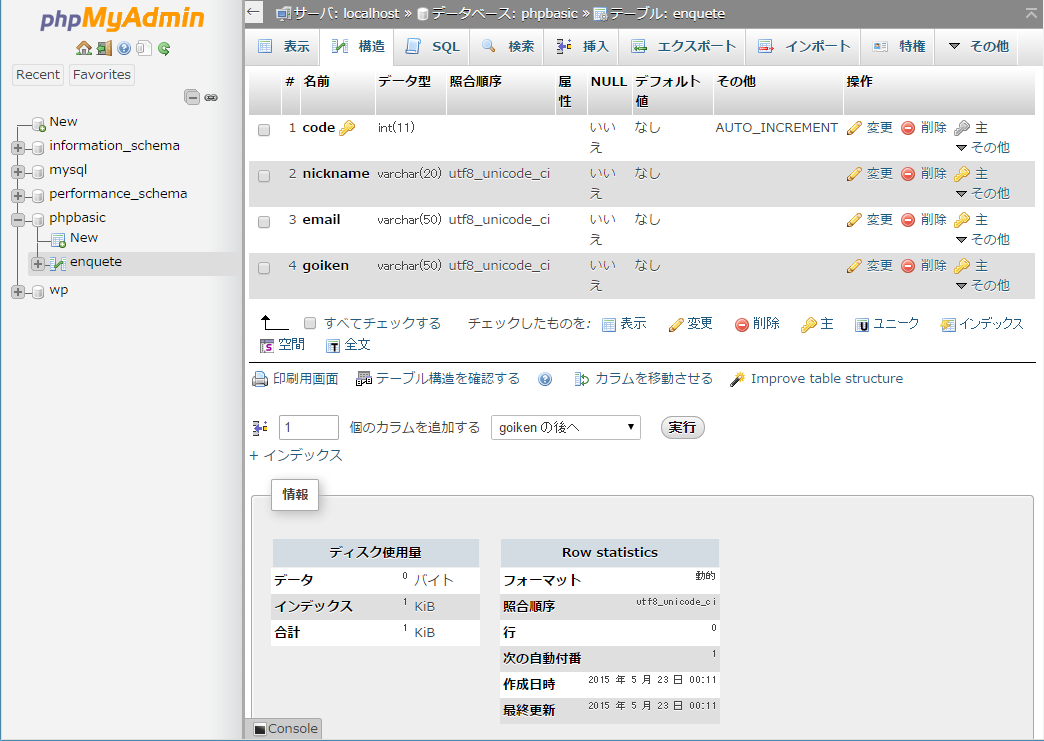
 作成する「テーブル名」と「カラム数」を入力し、「実行」します。
「code」フィールドは通し番号が入ります。同じ番号は使われません。同一人物が解答を繰り返しても追加されます。
 そのシステム内に一つしか無い番号と言うことで「ユニークコード」とも言われるとのこと。
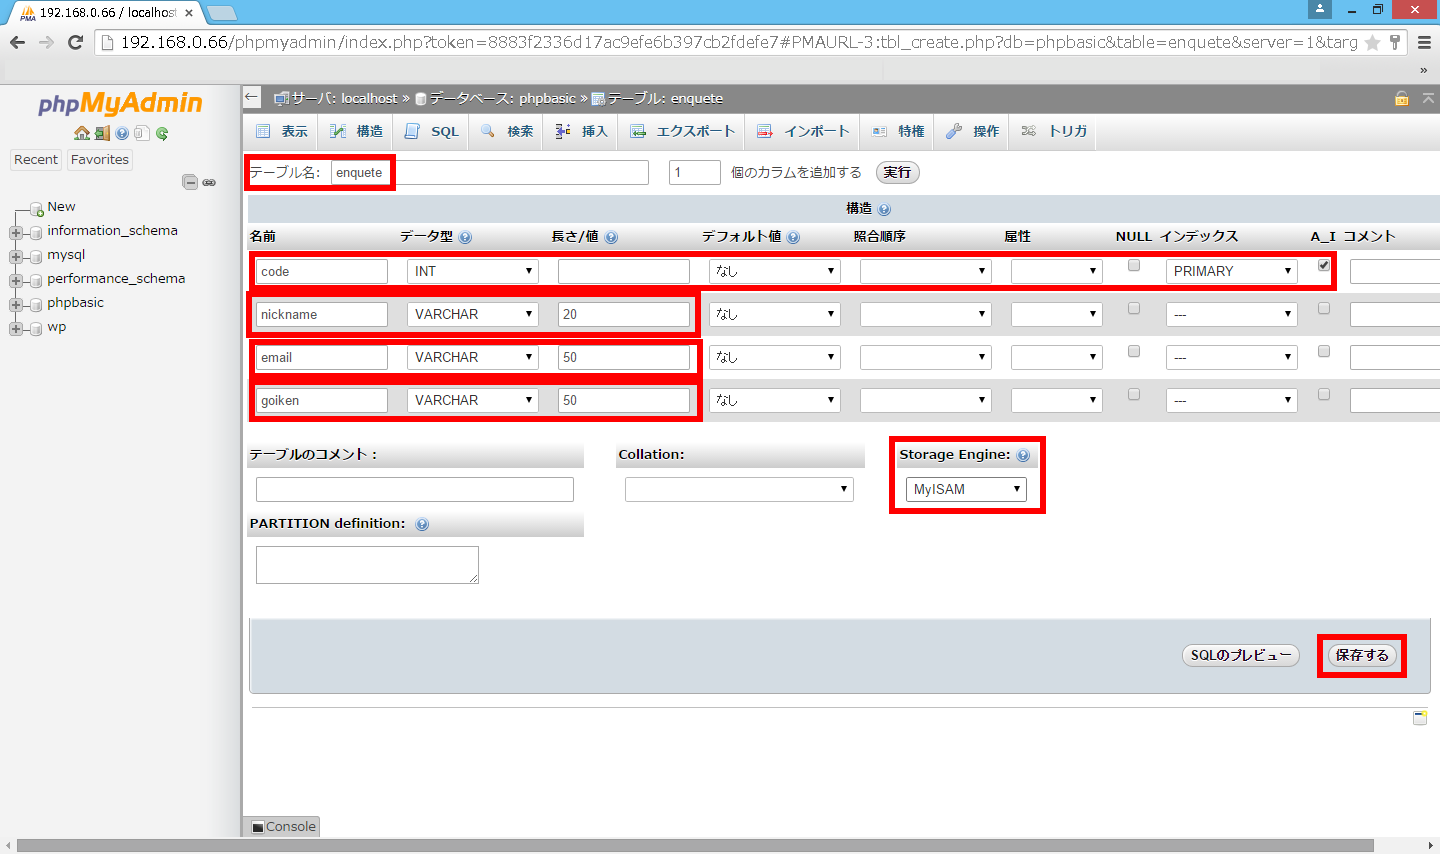
「code」「nickname」「email」「goiken」これがカラム数が「4」の理由です。
 フィールド名はPHPプログラムに合わせて命名しました。
「データ型」各々のフィールドに入力するデータのタイプを初めに設定します。
「INT」は整数を表します。(文字ではないので「長さ/値」には入力しない)
「VARCHAR」は文字列を表します。最大数値を設定しました。
「インデックス」は索引という意味で設定することにより検索が早くなるとのこと。個々のフィールドを検索欄として使用するか決めるのがインデックスの設定です。
「PRIMARY」1枚のテーブルの中で1つのフィールドにしか設定できないインデックスです。このとき選ばれるのは「そのテーブルを代表するフィールドである」という意味から、日本語では「主キー(プライマリーキー)」と呼ばれます。
 主キーとなることができるフィールドはその中にダブりが発生せずに、常にユニークな値となる物に限ります。(つまりインデックスをPRIMARYに設定することができるということ)
 氏名などは同姓同名がありえるので、主キーになることができないのはよくわかるでしょう。

「A_I」(auto increment)チェックを入れておくとレコードが追加されるたびに自動で通し番号を付けてくれます。


■「phpMyAdmin」から「SQL文」を入力してみる。

       
phpmyadmin_sql_page.png
 データベース「phpbasic」をクリックし「SQL」タブをクリックし、SQL文を入力し「実行」する。
INSERT INTO enquete (nickname,email,goiken) VALUES ("bibo-roku","email","なななもはー")
phpmyadmin_sql_add_page.png  入力の確認。
phpmyadmin_sql_check_page.png  テーブル「enquete」をクリックし「表示」タブをクリックし、確認する。
「SQL文」入力は補助機能があり便利でした。
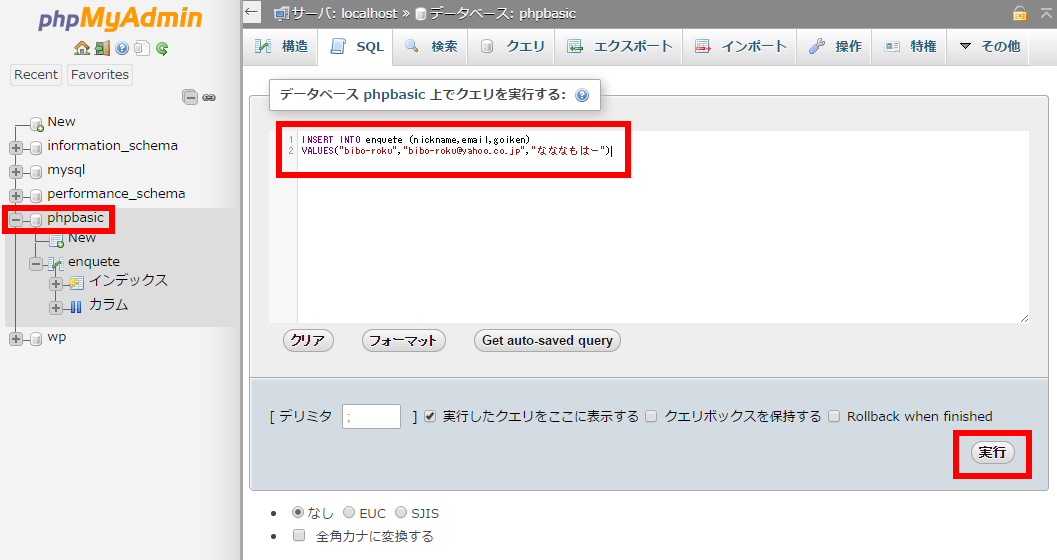
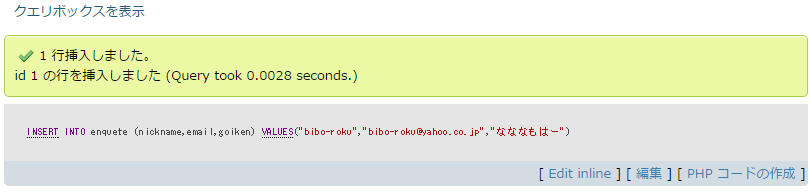
 INSERT INTO enquete  ←アンケートテーブルにレコードを追加します。
 (nickname,email,goiken) ←[1],[2],[3]
 VALUES
  ("bibo-roku","email","なななもはー") ←["1"],["2"],["3"] ↑の数値と対応します。「nickname=bibo-roku」という具合。
 フィールド「code」はautoincrementなので自動で入力されるため手動では入力不要です。
「編集」をクリックすることでデータの編集もできます。


■「PHP」で「SQL文」を入力させる。(アンケート内容を自動で保存させる。)

       
<!DOCTYPE HTML PUBLIC "-//W3C//DTD HTML 4.01 Transitional//EN">
<html>
<head>
<meta http-equiv="Content-Type" content="text/html; charset=UTF-8">
<title>アンケートのサンクス</title>
</head>
<body>

<?php $dsn = 'mysql:dbname=phpbasic;host=localhost'; ←一文追記。 $user = 'root'; ←一文追記。 $password = 'maria'; ←一文追記。 $dbh = new PDO($dsn,$user,$password); ←一文追記。 $dbh->query('SET NAMES utf8'); ←一文追記。
$nickname=$_POST['nickname']; $email=$_POST['email']; $goiken=$_POST['goiken'];
$nickname=htmlspecialchars($nickname); $email=htmlspecialchars($email); $goiken=$_POST['goiken'];
print $nickname; print '様<br>'; print 'ご意見ありがとうございました。<br>'; print 'いただいたご意見『'; print $goiken; print '』<br>'; print $email; print 'にメールを送りましたのでご確認ください。';
$mail_sub='アンケートを受け付けました。'; $mail_body=$nickname."様へ\nアンケートご協力ありがとうございました。"; $mail_body=html_entity_decode($mail_body,ENT_QUOTES,"UTF-8"); $mail_head='From:xxx@xxx.co.jp'; mb_language('Japanese'); mb_internal_encoding("UTF-8"); mb_send_mail($email,$mail_sub,$mail_body,$mail_head); $sql = 'INSERT INTO enquete (nickname,email,goiken) VALUES("'.$nickname.'","'.$email.'","'.$goiken.'")'; ←一文追記。
$stmt = $dbh->prepare($sql); ←一文追記。
$stmt->execute(); ←一文追記。 $dbh = null; ←一文追記。
?> </body> </html>
 先日作成した「thanks.php」に「MariaDB」に書き込みをさせるプログラムを追記します。
 プログラムで「SQL文」を使用するときは「接続」「命令」「切断」の過程を踏む必要があります。

$dsn = 'mysql:dbname=phpbasic;host=localhost';
dsn →パラメータ。データソースネーム。データベースに接続するために 必要な情報が含まれます。 指定されたデータベースへの接続を表す PDO インスタンスを生成します。
mysql: →接頭辞
dbname →データベース名を指定します。
host →データベースサーバーが存在するホスト名を指定します。
$user = 'root';
$password = 'XXXXX';
$dbh = new PDO($dsn,$user,$password);
dbh →パラメータ。データベースハンドル。MariaDBへの接続。
$dbh->query('SET NAMES utf8');
→$dbh->query('命令実行するSQL文');
データベース管理システムに対する処理要求(問い合わせ)を文字列として表したもの。


$sql = 'INSERT INTO enquete (nickname,email,goiken) VALUES("'.$nickname.'","'.$email.'","'.$goiken.'")';
$sql →ここにSQL文を記述する。
INSERT INTO →テーブルにデータを追加する。
$stmt = $dbh->prepare($sql); →SQL文で命令を出す準備。
$stmt->execute(); →その命令を出す。

$dbh = null; →データベースから切断する。

 編集後、ブラウザからデータを入力してみる。スマホからも成功しました。

■「SQL文」でデータを取り出す。

       
「SQL文」を入力する。
phpmyadmin_sql_sentence.png
表示はされるが警告も同時に表示される。
phpmyadmin_sql_sentence2.png
       
      
「SQLタグ」をクリックします。
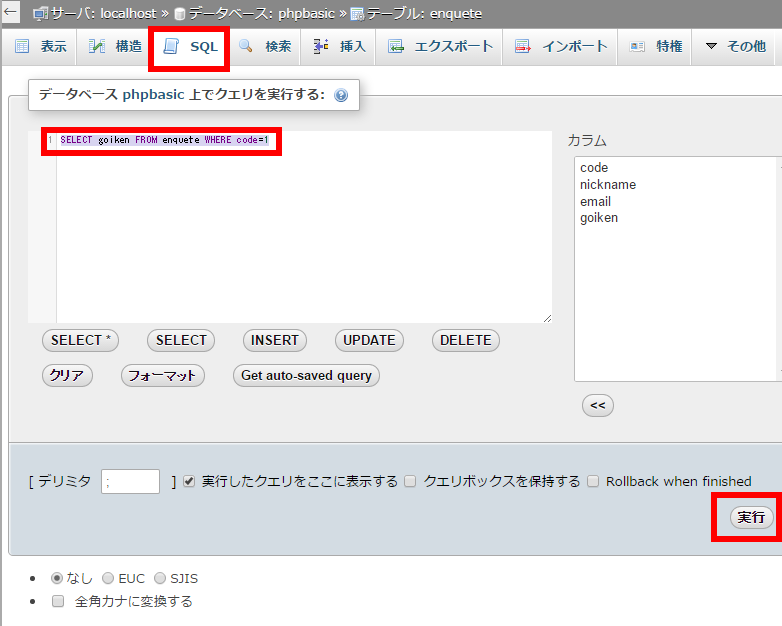
「SELECT goiken FROM enquete WHERE code=1」を入力します。そして「実行」をクリック。
SELECT goiken →「goiken」フィールドのデータをください。
FROM enquete →「enquete」テーブルから。
WHERE code=1 →「code=1」のデータを。
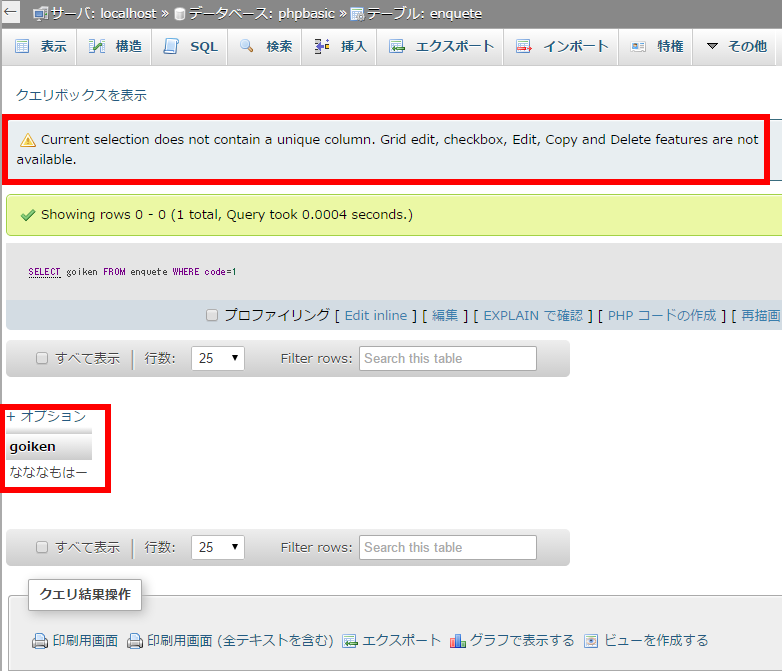
 上記の通り入力したのですが、書籍の通りの出力にはどうしてもなりませんでした。警告が出るのです。
「Current selection does not contain a unique column. Grid edit, checkbox, Edit, Copy and Delete features are not available.」  ネットで調べてもincrementにはチェックを入れているしちょっと解らない状態です。書籍でのPHPのバージョンなども異なりますのでその辺が原因かも知れません。
 ですが下記命令は書籍通り表示できました。
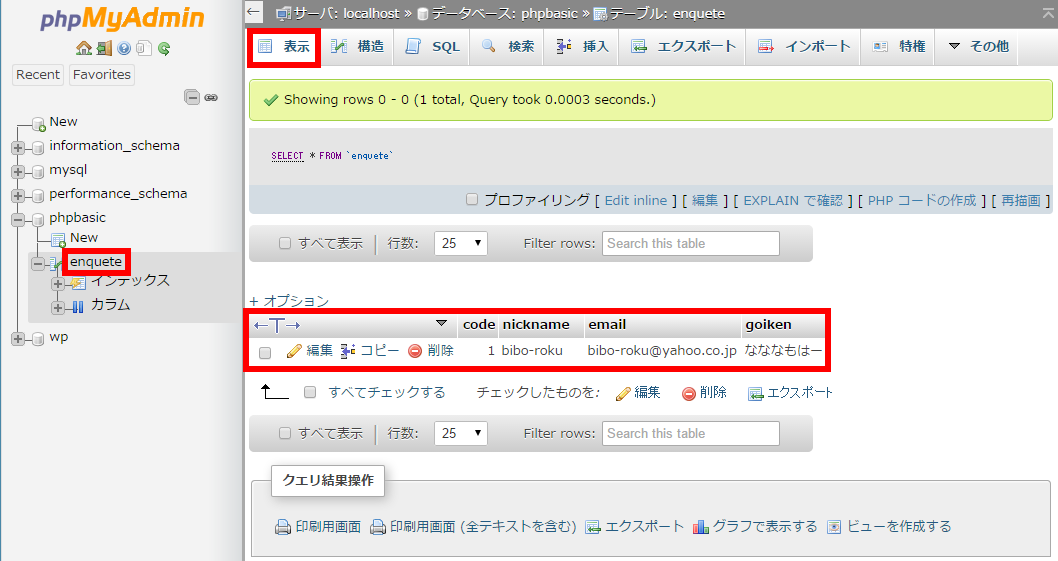
「SELECT * FROM enquete WHERE 1」
SELECT *  →全てのフィールドのデータをください。
FROM enquete  →「enquete」デーブルから。
WHERE 1 →無条件で全部。 「1」が無条件で全部。

 これで一応データの呼び出しはできましたね。


「MariaDB10.0」の設定、動作確認。 [MariaDB]

「MariaDB10.0」の設定、動作確認。

■「MariaDB」の初期設定。

       
[bibo-roku@centos ~]$ sudo mysql_secure_installation ←初期の設定開始。
[sudo] password for bibo-roku: 

NOTE: RUNNING ALL PARTS OF THIS SCRIPT IS RECOMMENDED FOR ALL MariaDB
      SERVERS IN PRODUCTION USE!  PLEASE READ EACH STEP CAREFULLY!

In order to log into MariaDB to secure it, we'll need the current
password for the root user.  If you've just installed MariaDB, and
you haven't set the root password yet, the password will be blank,
so you should just press enter here.

Enter current password for root (enter for none): ←「ENTERキー」
ERROR 2002 (HY000): Can't connect to local MySQL server through socket '/var/lib/mysql/mysql.sock' (2 "No such file or directory") ←エラー発生。

[bibo-roku@centos ~]$ sudo reboot ←エラー対処に再起動実施。

Enter current password for root (enter for none): ←再実施「空ENTERキー」
OK, successfully used password, moving on...

Setting the root password ensures that nobody can log into the MariaDB
root user without the proper authorisation.

Set root password? [Y/n] ←「空ENTERキー」※「Y」の意味。

New password:  ←任意のパスワード入力。
Re-enter new password:  ←パスワード再入力。
Password updated successfully!
Reloading privilege tables..
 ... Success!


By default, a MariaDB installation has an anonymous user, allowing anyone
to log into MariaDB without having to have a user account created for
them.  This is intended only for testing, and to make the installation
go a bit smoother.  You should remove them before moving into a
production environment.

Remove anonymous users? [Y/n]  ←「空ENTERキー」

 ... Success!

Normally, root should only be allowed to connect from 'localhost'.  This
ensures that someone cannot guess at the root password from the network.

Disallow root login remotely? [Y/n]  ←「空ENTERキー」
By default, MariaDB comes with a database named 'test' that anyone can
access.  This is also intended only for testing, and should be removed
before moving into a production environment.

Remove test database and access to it? [Y/n]  ←「空ENTERキー」
 - Dropping test database...
 ... Success!
 - Removing privileges on test database...
 ... Success!

Reloading the privilege tables will ensure that all changes made so far
will take effect immediately.

Reload privilege tables now? [Y/n] ←「空ENTERキー」
 ... Success!

Cleaning up...

All done!  If you've completed all of the above steps, your MariaDB
installation should now be secure.

Thanks for using MariaDB!


 初期設定開始のコマンドを入力し設定を開始します。
「root」ユーザのパスワードを問われますが、「空のENTERキー」を押します。


「mysql.sock」に繋げられないというエラーのようです。
「/var/lib/mysql/」に見覚えがあるぞと思ったら、インストール時にそのディレクトリが無いぞと怒られていましたね。ですが、ディレクトリは作成されていました。
 しかし「mysql.sock」は見つかりませんでした。
 インターネット検索をしてみると、「ソケットファイルが削除されている場合があります。この場合、MySQLサーバーを一旦シャットダウンして再起動をかけるとソケットファイルが復元されます。」とのこと。
「CentOS」を再起動させたところ、「mysql.sock」が現れました。

 再度、初期設定を始めます。パスワード入力以外は全て「空ENTERキー」=「Yes」で進めます。

「Set root password?」→パスワードを作成しますか?
「New password:」→入力。
「Re-enter new password:」→再入力。
「Remove anonymous users?」→匿名のユーザーを削除しますか?
「Disallow root login remotely?」→リモートユーザのログインを禁止しますか?
「Remove test database and access to it? 」→テストデータベースを削除しますか?
「Reload privilege tables now?」


■設定ファイルの編集。

       
[bibo-roku@centos ~]$ sudo vi /etc/my.cnf.d/server.cnf
---省略---
# this is only for the mysqld standalone daemon
[mysqld]
character-set-server = utf8 ←一文追記。
---省略---

[bibo-roku@centos ~]$ sudo /etc/init.d/mysql restart ←反映させる。
Shutting down MySQL.. SUCCESS! 
Starting MySQL..... SUCCESS!


 漢字を扱えるようにするために「utf-8」を追記するとのこと。
 ※それ以前に作成されたデータには反映されないみたいなので漢字を扱うなら初めに設定しておく。
 また反映させるためには「MariaDB」を再起動させます。


■「MariaDB」の動作確認。

       
[bibo-roku@centos ~]$ sudo /etc/init.d/mysql start ←起動。
Starting MySQL SUCCESS!

[bibo-roku@centos ~]$ mysql -u root -p ←「root」ユーザーでログイン。
Enter password: 
Welcome to the MariaDB monitor.  Commands end with ; or \g.
Your MariaDB connection id is 12
Server version: 10.0.17-MariaDB MariaDB Server

Copyright (c) 2000, 2015, Oracle, MariaDB Corporation Ab and others.

Type 'help;' or '\h' for help. Type '\c' to clear the current input statement.

MariaDB [(none)]> grant all privileges on test.* to 'bibo-roku'@localhost identified by 'bibo-rokupass'; ←新規ユーザー作成。
Query OK, 0 rows affected (0.00 sec)

MariaDB [(none)]> select user from mysql.user where user='bibo-roku';
+-----------+
| user      |
+-----------+
| bibo-roku | ←bibo-rokuの登録確認。
+-----------+
1 row in set (0.00 sec)

MariaDB [(none)]> exit ←ログアウト。
Bye

[bibo-roku@centos ~]$ mysql -u 'bibo-roku' -pbibo-rokupass ←「bibo-roku」でログイン。
---省略---

MariaDB [(none)]> create database test; ←testデータベース作成。
Query OK, 1 row affected (0.00 sec)

MariaDB [(none)]> show databases;
+--------------------+
| Database           |
+--------------------+
| information_schema |
| test               | ←確認。
+--------------------+
2 rows in set (0.00 sec)

MariaDB [(none)]> use test;
Database changed
MariaDB [test]> ←[test]に。

MariaDB [test]> create table test(num int, name varchar(50));
Query OK, 0 rows affected (0.09 sec)

MariaDB [test]> show tables;
+----------------+
| Tables_in_test |
+----------------+
| test           | ←確認。
+----------------+
1 row in set (0.00 sec)

MariaDB [test]> insert into test values(1,'山田太郎');
Query OK, 1 row affected (0.00 sec)

MariaDB [test]> select * from test;
+------+--------------+
| num  | name         |
+------+--------------+
|    1 | 山田太郎     | ←確認。
+------+--------------+
1 row in set (0.00 sec)

MariaDB [test]> update test set name='山田次郎';
Query OK, 1 row affected (0.06 sec)
Rows matched: 1  Changed: 1  Warnings: 0

MariaDB [test]> select * from test;
+------+--------------+
| num  | name         |
+------+--------------+
|    1 | 山田次郎     | ←変更確認。
+------+--------------+
1 row in set (0.00 sec)

MariaDB [test]> delete from test where num=1;
Query OK, 1 row affected (0.13 sec)

MariaDB [test]> select * from test;
Empty set (0.00 sec) ←「Empty」確認。

MariaDB [test]> drop table test;
Query OK, 0 rows affected (0.03 sec)

MariaDB [test]> show tables;
Empty set (0.00 sec) ←「Empty」確認。

MariaDB [test]> drop database test;
Query OK, 0 rows affected (0.00 sec)

MariaDB [(none)]> show databases;
+--------------------+
| Database           |
+--------------------+
| information_schema | ←確認。
+--------------------+
1 row in set (0.00 sec)

MariaDB [(none)]> exit 
Bye

[bibo-roku@centos ~]$ mysql -u root -p
Enter password: 
---省略---
MariaDB [(none)]> revoke all privileges on *.* from 'bibo-roku'@localhost;
Query OK, 0 rows affected (0.00 sec)

MariaDB [(none)]> delete from mysql.user where user='bibo-roku' and host='localhost';
Query OK, 1 row affected (0.00 sec)

MariaDB [(none)]> select user from mysql.user where user='bibo-roku';
Empty set (0.00 sec) ←「Empty」確認。

MariaDB [(none)]> flush privileges;
Query OK, 0 rows affected (0.00 sec)

MariaDB [(none)]> exit
Bye


 上記の「MariaDB」の動作確認は。下記サイト様の内容をそのまま実施させていただきました。ありがとうございました。
 http://centossrv.com/mariadb.shtml

 流れとしては「testデータベースへの全てのアクセス権限を持った、新規ユーザbibo-rokuを登録」※「-」ハイフンが入るユーザー名を使うときは「'」シングルクォーテーションで囲む必要があります。
「testデータベース作成」→「testデータベースに接続」→「testデータベースにテーブル作成」→「testテーブルに山田太郎登録」→「山田太郎を山田次郎に変更」→「testテーブル内データ削除」→「testテーブル削除」→「testデータベース削除」→「bibo-rokuユーザから全てのデータベースへのアクセス権限を剥奪」→「bibo-rokuの削除」→「MariaDBサーバへ反映」
 テキストで扱うのは難しそうですね……。
 調べてみると、「phpMyAdmin」というモノがあるそうです。


「MariaDB_10.0」のインストール。 [MariaDB]

「MariaDB_10.0」のインストール。

■「RPM-GPG-KEY」インポート。

       
[bibo-roku@centos ~]$ rpm -qa | grep mysql ←競合を調査
php56u-mysqlnd-5.6.4-1.ius.el6.i386
mysql-libs-5.1.73-3.el6_5.i686

[bibo-roku@centos ~]$ sudo rpm -e --nodeps mysql-libs ←「--nodeps」

[bibo-roku@centos ~]$ sudo rpm --import http://yum.mariadb.org/RPM-GPG-KEY-MariaDB ←GPG-KEYインポート。

[bibo-roku@centos ~]$ sudo rpm -qai gpg-pubkey ←KEYの確認。
---省略---
Name        : gpg-pubkey                   Relocations: (not relocatable)
Version     : 1bb943db                          Vendor: (none)
Release     : 511147a9                      Build Date: 2015年05月02日 21時52分32秒
Install Date: 2015年05月02日 21時52分32秒      Build Host: localhost
Group       : Public Keys                   Source RPM: (none)
Size        : 0                                License: pubkey
Signature   : (none)
Summary     : gpg(MariaDB Package Signing Key )
Description :
-----BEGIN PGP PUBLIC KEY BLOCK-----
Version: rpm-4.8.0 (NSS-3)
---省略---
       
      
「MariaDB_10.0」をインストールする前には競合するパッケージを消す必要があるそうですので、調べてみます。
 後者の「mysql-libs-5.1.73-3.el6_5.i686」が競合するようなのですが、なんで入っているのかな。依存関係かな。
 依存関係無視で「mysql-libs-5.1.73-3.el6_5.i686」アンインストールします。
 次に「RPM-GPG-KEY」をインポートします。その後、確認をしてみたのですがファイルをダウンロードしてからインポートするわけでは無いのかな?
   ファイルはありませんでした。(rpm -qai gpg-pubkeyで確認はできました。)
 

■リポジトリのインストール。

       
https://downloads.mariadb.org/mariadb/repositories/#mirror=yamagata-university
「CentOS」→「CentOS6(32bit)」→「10.0」

# MariaDB 10.0 CentOS repository list - created 2015-05-02 13:25 UTC
# http://mariadb.org/mariadb/repositories/
[mariadb]
name = MariaDB
baseurl = http://yum.mariadb.org/10.0/centos6-x86
gpgkey=https://yum.mariadb.org/RPM-GPG-KEY-MariaDB
gpgcheck=1
enabled=0 ←追記。

[bibo-roku@centos ~]$ sudo vi mariadb.repo
       
      
 リポジトリはファイルでは存在しないようで、公式HPにて自分のサーバの条件を指定していけばテキストが表示されるのでこれをコピーすることでリポジトリを作成するようです。
 現れたテキストについでに「enabled=0」を追記しました。
「vi」コマンドで保存します。

■「MariaDB」のインストール。

       
[bibo-roku@centos ~]$ sudo yum install --enablerepo=mariadb MariaDB-devel MariaDB-client MariaDB-server

警告: RPMDB は yum 以外で変更されました。
** Found 4 pre-existing rpmdb problem(s), 'yum check' output follows:
php56u-pdo-5.6.4-1.ius.el6.i386 は次のインストール済みと衝突しています:   php-pdo < ('0', '5.6', None): php56u-pdo-5.6.4-1.ius.el6.i386
2:postfix-2.6.6-6.el6_5.i686 は次の要求が不足ています:  libmysqlclient.so.16
2:postfix-2.6.6-6.el6_5.i686 は次の要求が不足ています:  libmysqlclient.so.16(libmysqlclient_16)
2:postfix-2.6.6-6.el6_5.i686 は次の要求が不足ています:  mysql-libs
  インストールしています  : MariaDB-common-10.0.17-1.el6.i686 1/6
  インストールしています  : MariaDB-compat-10.0.17-1.el6.i686 2/6
  インストールしています  : MariaDB-client-10.0.17-1.el6.i686 3/6
  インストールしています  : perl-DBI-1.609-4.el6.i686         4/6
  インストールしています  : MariaDB-devel-10.0.17-1.el6.i686  5/6
  インストールしています  : MariaDB-server-10.0.17-1.el6.i686 6/6 
chown: cannot access `/var/lib/mysql': そのようなファイルやディレクトリはありません
150502 22:46:48 [Note] InnoDB: Using mutexes to ref count buffer pool pages
150502 22:46:48 [Note] InnoDB: The InnoDB memory heap is disabled
150502 22:46:48 [Note] InnoDB: Mutexes and rw_locks use GCC atomic builtins
150502 22:46:48 [Note] InnoDB: Memory barrier is not used
150502 22:46:48 [Note] InnoDB: Compressed tables use zlib 1.2.3
150502 22:46:48 [Note] InnoDB: Using Linux native AIO
150502 22:46:48 [Note] InnoDB: Not using CPU crc32 instructions
150502 22:46:48 [Note] InnoDB: Initializing buffer pool, size = 128.0M
150502 22:46:48 [Note] InnoDB: Completed initialization of buffer pool
150502 22:46:48 [Note] InnoDB: The first specified data file ./ibdata1 did not exist: a new database to be created!
150502 22:46:48 [Note] InnoDB: Setting file ./ibdata1 size to 12 MB
150502 22:46:48 [Note] InnoDB: Database physically writes the file full: wait...
150502 22:46:57 [Note] InnoDB: Setting log file ./ib_logfile101 size to 48 MB
150502 22:47:12 [Note] InnoDB: Setting log file ./ib_logfile1 size to 48 MB
150502 22:47:17 [Note] InnoDB: Renaming log file ./ib_logfile101 to ./ib_logfile0
150502 22:47:17 [Warning] InnoDB: New log files created, LSN=45781
150502 22:47:17 [Note] InnoDB: Doublewrite buffer not found: creating new
150502 22:47:17 [Note] InnoDB: Doublewrite buffer created
150502 22:47:17 [Note] InnoDB: 128 rollback segment(s) are active.
150502 22:47:17 [Warning] InnoDB: Creating foreign key constraint system tables.
150502 22:47:17 [Note] InnoDB: Foreign key constraint system tables created
150502 22:47:17 [Note] InnoDB: Creating tablespace and datafile system tables.
150502 22:47:17 [Note] InnoDB: Tablespace and datafile system tables created.
150502 22:47:17 [Note] InnoDB: Waiting for purge to start
150502 22:47:17 [Note] InnoDB:  Percona XtraDB (http://www.percona.com) 5.6.22-72.0 started; log sequence number 0
150502 22:47:18 [Note] InnoDB: FTS optimize thread exiting.
150502 22:47:18 [Note] InnoDB: Starting shutdown...
150502 22:47:20 [Note] InnoDB: Shutdown completed; log sequence number 1616697
150502 22:47:20 [Note] InnoDB: Using mutexes to ref count buffer pool pages
150502 22:47:20 [Note] InnoDB: The InnoDB memory heap is disabled
150502 22:47:20 [Note] InnoDB: Mutexes and rw_locks use GCC atomic builtins
150502 22:47:20 [Note] InnoDB: Memory barrier is not used
150502 22:47:20 [Note] InnoDB: Compressed tables use zlib 1.2.3
150502 22:47:20 [Note] InnoDB: Using Linux native AIO
150502 22:47:20 [Note] InnoDB: Not using CPU crc32 instructions
150502 22:47:20 [Note] InnoDB: Initializing buffer pool, size = 128.0M
150502 22:47:20 [Note] InnoDB: Completed initialization of buffer pool
150502 22:47:20 [Note] InnoDB: Highest supported file format is Barracuda.
150502 22:47:21 [Note] InnoDB: 128 rollback segment(s) are active.
150502 22:47:21 [Note] InnoDB: Waiting for purge to start
150502 22:47:21 [Note] InnoDB:  Percona XtraDB (http://www.percona.com) 5.6.22-72.0 started; log sequence number 1616697
150502 22:47:21 [Note] InnoDB: FTS optimize thread exiting.
150502 22:47:21 [Note] InnoDB: Starting shutdown...
150502 22:47:23 [Note] InnoDB: Shutdown completed; log sequence number 1616707

PLEASE REMEMBER TO SET A PASSWORD FOR THE MariaDB root USER !
To do so, start the server, then issue the following commands:

'/usr/bin/mysqladmin' -u root password 'new-password'
'/usr/bin/mysqladmin' -u root -h centos.mydomain password 'new-password'

Alternatively you can run:
'/usr/bin/mysql_secure_installation'

which will also give you the option of removing the test
databases and anonymous user created by default.  This is
strongly recommended for production servers.

See the MariaDB Knowledgebase at http://mariadb.com/kb or the
MySQL manual for more instructions.

Please report any problems at http://mariadb.org/jira

The latest information about MariaDB is available at http://mariadb.org/.
You can find additional information about the MySQL part at:
http://dev.mysql.com
Support MariaDB development by buying support/new features from MariaDB
Corporation Ab. You can contact us about this at sales@mariadb.com.
Alternatively consider joining our community based development effort:
http://mariadb.com/kb/en/contributing-to-the-mariadb-project/

  Verifying : MariaDB-compat-10.0.17-1.el6.i686 1/6
  Verifying : MariaDB-common-10.0.17-1.el6.i686 2/6
  Verifying : MariaDB-client-10.0.17-1.el6.i686 3/6
  Verifying : perl-DBI-1.609-4.el6.i686         4/6
  Verifying : MariaDB-devel-10.0.17-1.el6.i686  5/6
  Verifying : MariaDB-server-10.0.17-1.el6.i686 6/6

インストール:
  MariaDB-client.i686 0:10.0.17-1.el6
  MariaDB-devel.i686 0:10.0.17-1.el6
  MariaDB-server.i686 0:10.0.17-1.el6

依存性関連をインストールしました:
  MariaDB-common.i686 0:10.0.17-1.el6
  MariaDB-compat.i686 0:10.0.17-1.el6
  perl-DBI.i686 0:1.609-4.el6 

完了しました!

[root@centos ~]# yum provides --enablerepo=mariadb,epel,ius mysql-libs
MariaDB-compat-10.0.17-1.el6.i686 : MariaDB: a very fast and robust SQL database server
リポジトリー        : installed ←今インストールしたものに包含。
一致          :
その他        : Provides-match: mysql-libs ←インストール中のパッケージに入っているのでエラーは無視。


 一応「完了しました!」は表示されているのでインストールは成功したのでしょうか。
しかし以下問題があります。
「警告: RPMDB は yum 以外で変更されました。」
 →yum以外のコマンドやソフトでRPMDBが変更されたことを表す。とのこと。
 また、気にしなくてもよいが、この警告が出て、yumのインストールが実行されないことがある。とのこと。
 yumのキャッシュをクリアする「yum clean all」コマンドで解決するとのこと。
「php56u-pdo-5.6.4-1.ius.el6.i386 は次のインストール済みと衝突しています:  php-pdo < ('0', '5.6', None): php56u-pdo-5.6.4-1.ius.el6.i386」
 →うーん。宜しくないのでしょうねぇ。でも他にPHP-PDOが見つからないのです。パス。
「2:postfix-2.6.6-6.el6_5.i686 は次の要求が不足ています:libmysqlclient.so.16」
 →「yum provides --enablerepo=mariadb,epel,ius libmysqlclient.so.16」コマンドを実施したところ「MariaDB-compat-10.0.17-1.el6.i686」にも入っているので、今インストールしたということでこのままで良いのではないでしょうか。
「2:postfix-2.6.6-6.el6_5.i686 は次の要求が不足ています: libmysqlclient.so.16(libmysqlclient_16)」
 →上と同様みたいなのでOKにします。
「2:postfix-2.6.6-6.el6_5.i686 は次の要求が不足ています: mysql-libs」
 →上と同様で「MariaDB-compat-10.0.17-1.el6.i686」に入っているのでOKにします。


この広告は前回の更新から一定期間経過したブログに表示されています。更新すると自動で解除されます。